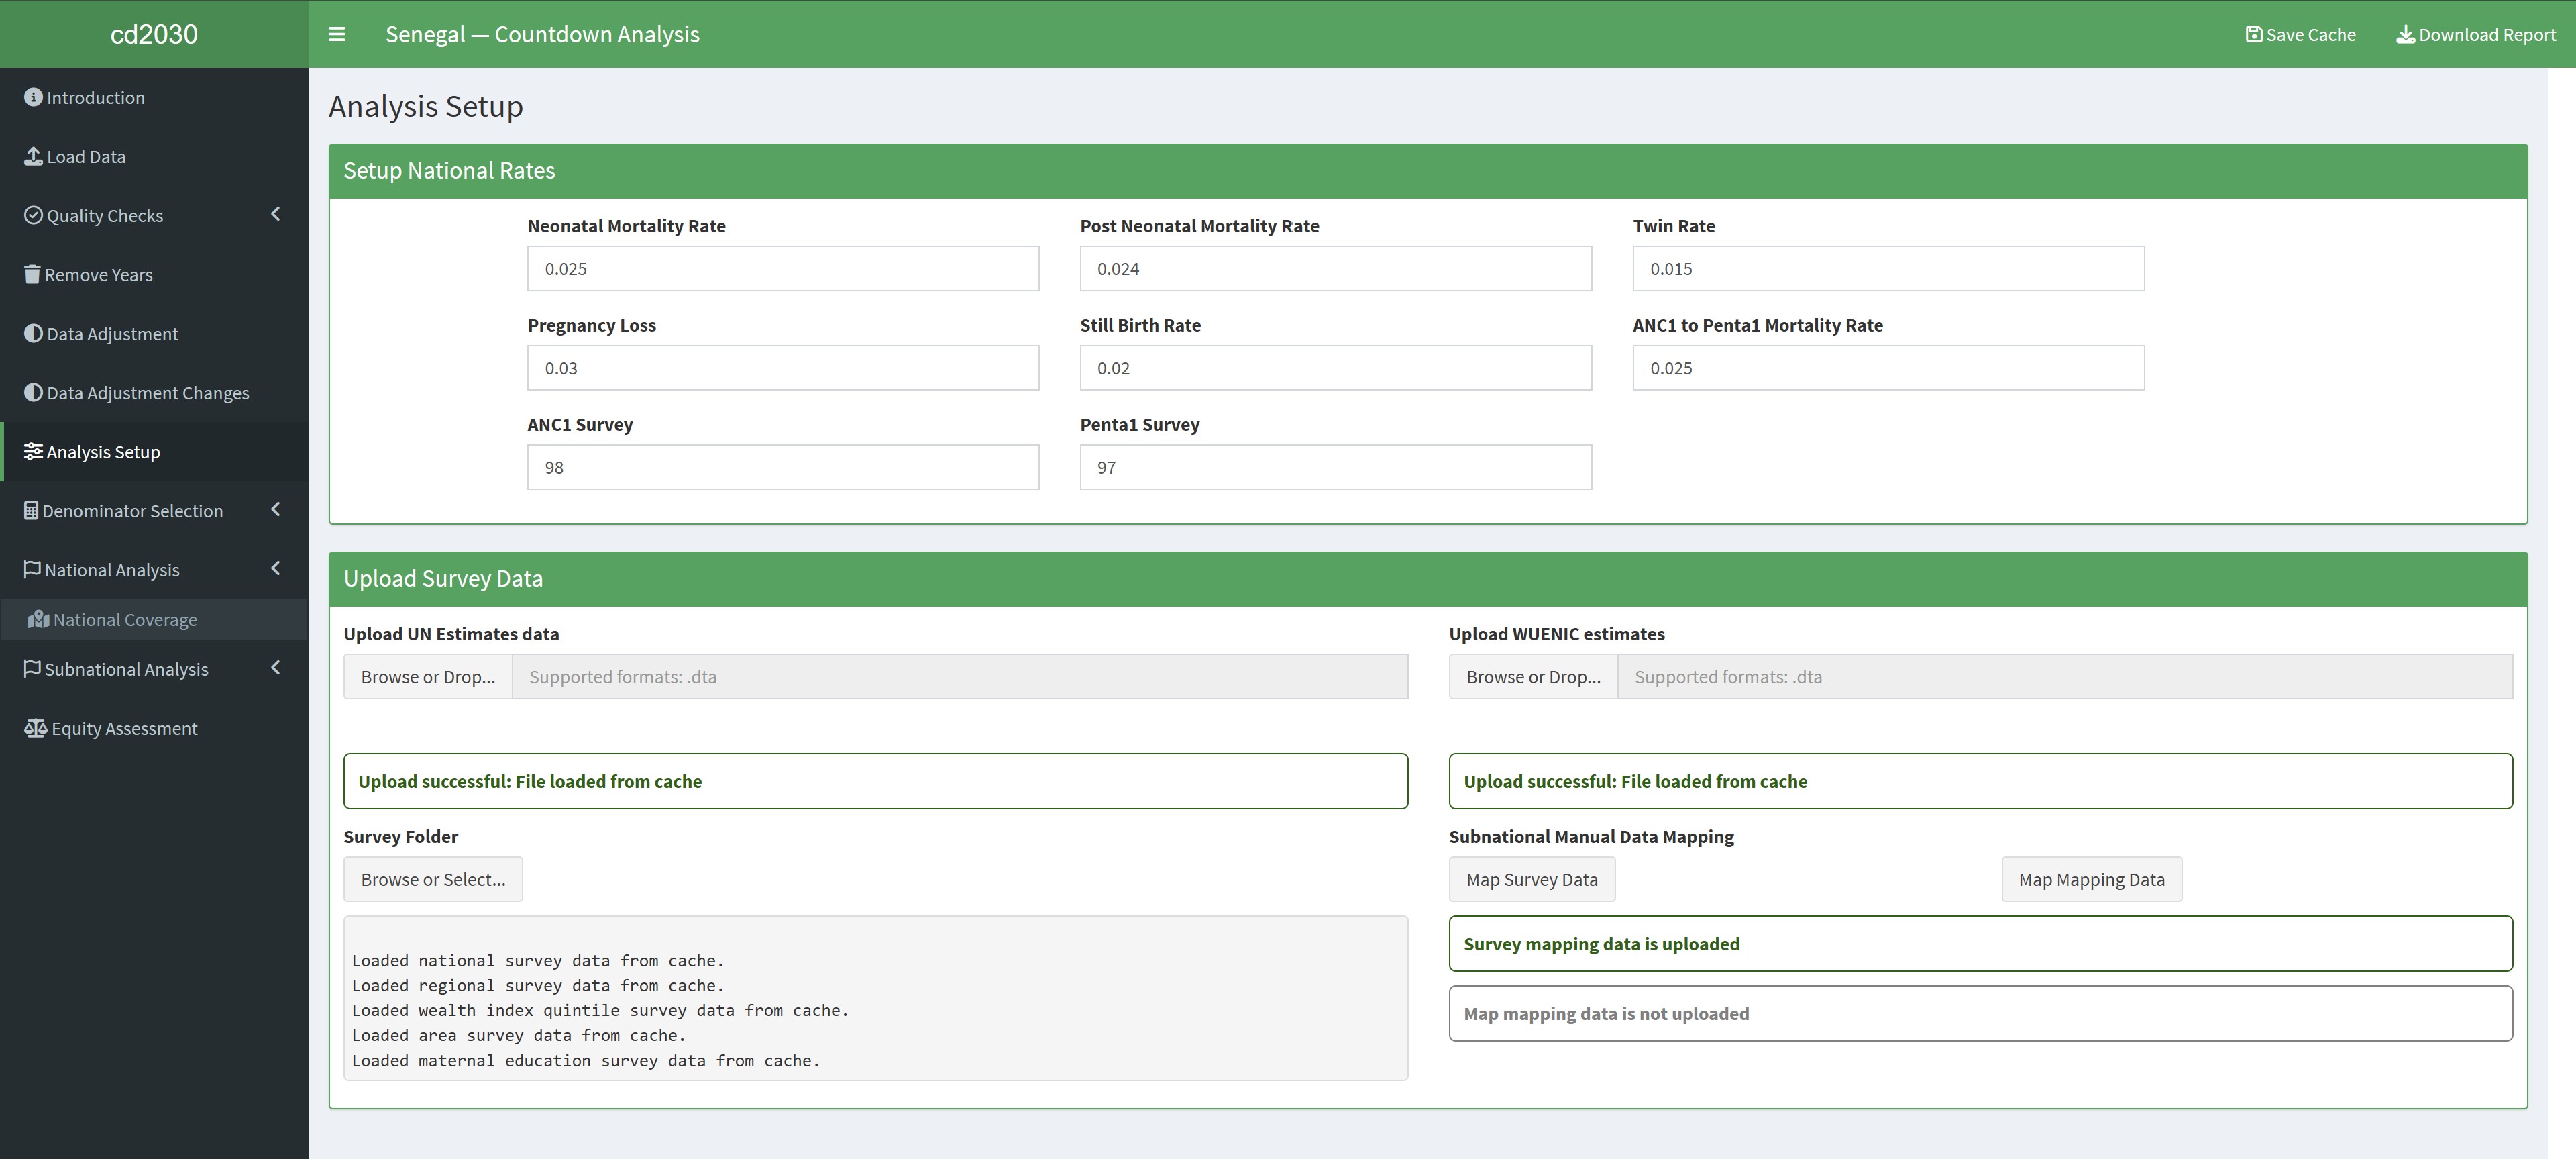
8 Analysis Setup
The Analysis Set-up feature allows users to configure national rates and upload necessary survey data to facilitate analysis. This guide provides a step-by-step explanation of how to set up national rates and upload survey data using the interface. Please note that file uploads are mandatory to proceed with any analysis beyond the set-up phase.
8.1 Setup National Rates
The Set-up National Rates section enables you to input key national-level indicators. Follow these steps to configure them:
8.1.1 Fields to Complete:
- Neonatal Mortality Rate:
- Enter the neonatal mortality rate (e.g.,
0.025).
- Enter the neonatal mortality rate (e.g.,
- Post Neonatal Mortality Rate:
- Specify the post-neonatal mortality rate (e.g.,
0.024).
- Specify the post-neonatal mortality rate (e.g.,
- Twin Rate:
- Input the rate of twin births (e.g.,
0.015).
- Input the rate of twin births (e.g.,
- Pregnancy Loss:
- Provide the rate of pregnancy loss (e.g.,
0.03).
- Provide the rate of pregnancy loss (e.g.,
- Still Birth Rate:
- Enter the stillbirth rate (e.g.,
0.02).
- Enter the stillbirth rate (e.g.,
- ANC1 to Penta1 Mortality Rate:
- Include the ANC1 to Penta1 mortality rate (e.g.,
0.025).
- Include the ANC1 to Penta1 mortality rate (e.g.,
- ANC1 Survey:
- Input the ANC1 survey coverage percentage (e.g.,
98).
- Input the ANC1 survey coverage percentage (e.g.,
- Penta1 Survey:
- Provide the Penta1 survey coverage percentage (e.g.,
97).
- Provide the Penta1 survey coverage percentage (e.g.,
8.1.2 Steps:
- Enter the appropriate values for each field.
- Ensure accuracy as these rates are crucial for subsequent analyses.
8.2 Upload Survey Data
The Upload Survey Data section allows you to upload necessary datasets for analysis. It supports files in .dta format. Follow the instructions below:
8.2.1 Upload UN Estimates Data
- Click on “Browse or Drop…” under the Upload UN Estimates data section.
- Select the file containing UN estimates data in
.dtaformat. - Wait for the upload confirmation message.
8.2.2 Upload WUENIC Estimates
- Similarly, click on “Browse or Drop…” under the Upload WUENIC estimates section.
- Choose the file with WUENIC data in
.dtaformat. - Confirm the upload completion.
8.2.3 Configure Survey Folder
- Click “Browse or Drop…” under the Survey Folder section.
- Navigate to the folder containing your survey files.
- Select the folder and verify the folder path.
8.2.4 Subnational Manual Data Mapping
- Use the Map Survey Data button to map subnational survey data.
- Use the Map Mapping Data button to map shapefile data
8.3 Manual Mapping of Survey Data
The Manual Mapping of Survey Data feature enables users to align survey data with subnational regions accurately. This is crucial for ensuring consistency across administrative regions.
8.3.1 Steps to Map Survey Data:
- Open the Manual Mapping Window:
- Click on the “Map Survey Data” button in the Subnational Manual Data Mapping section.
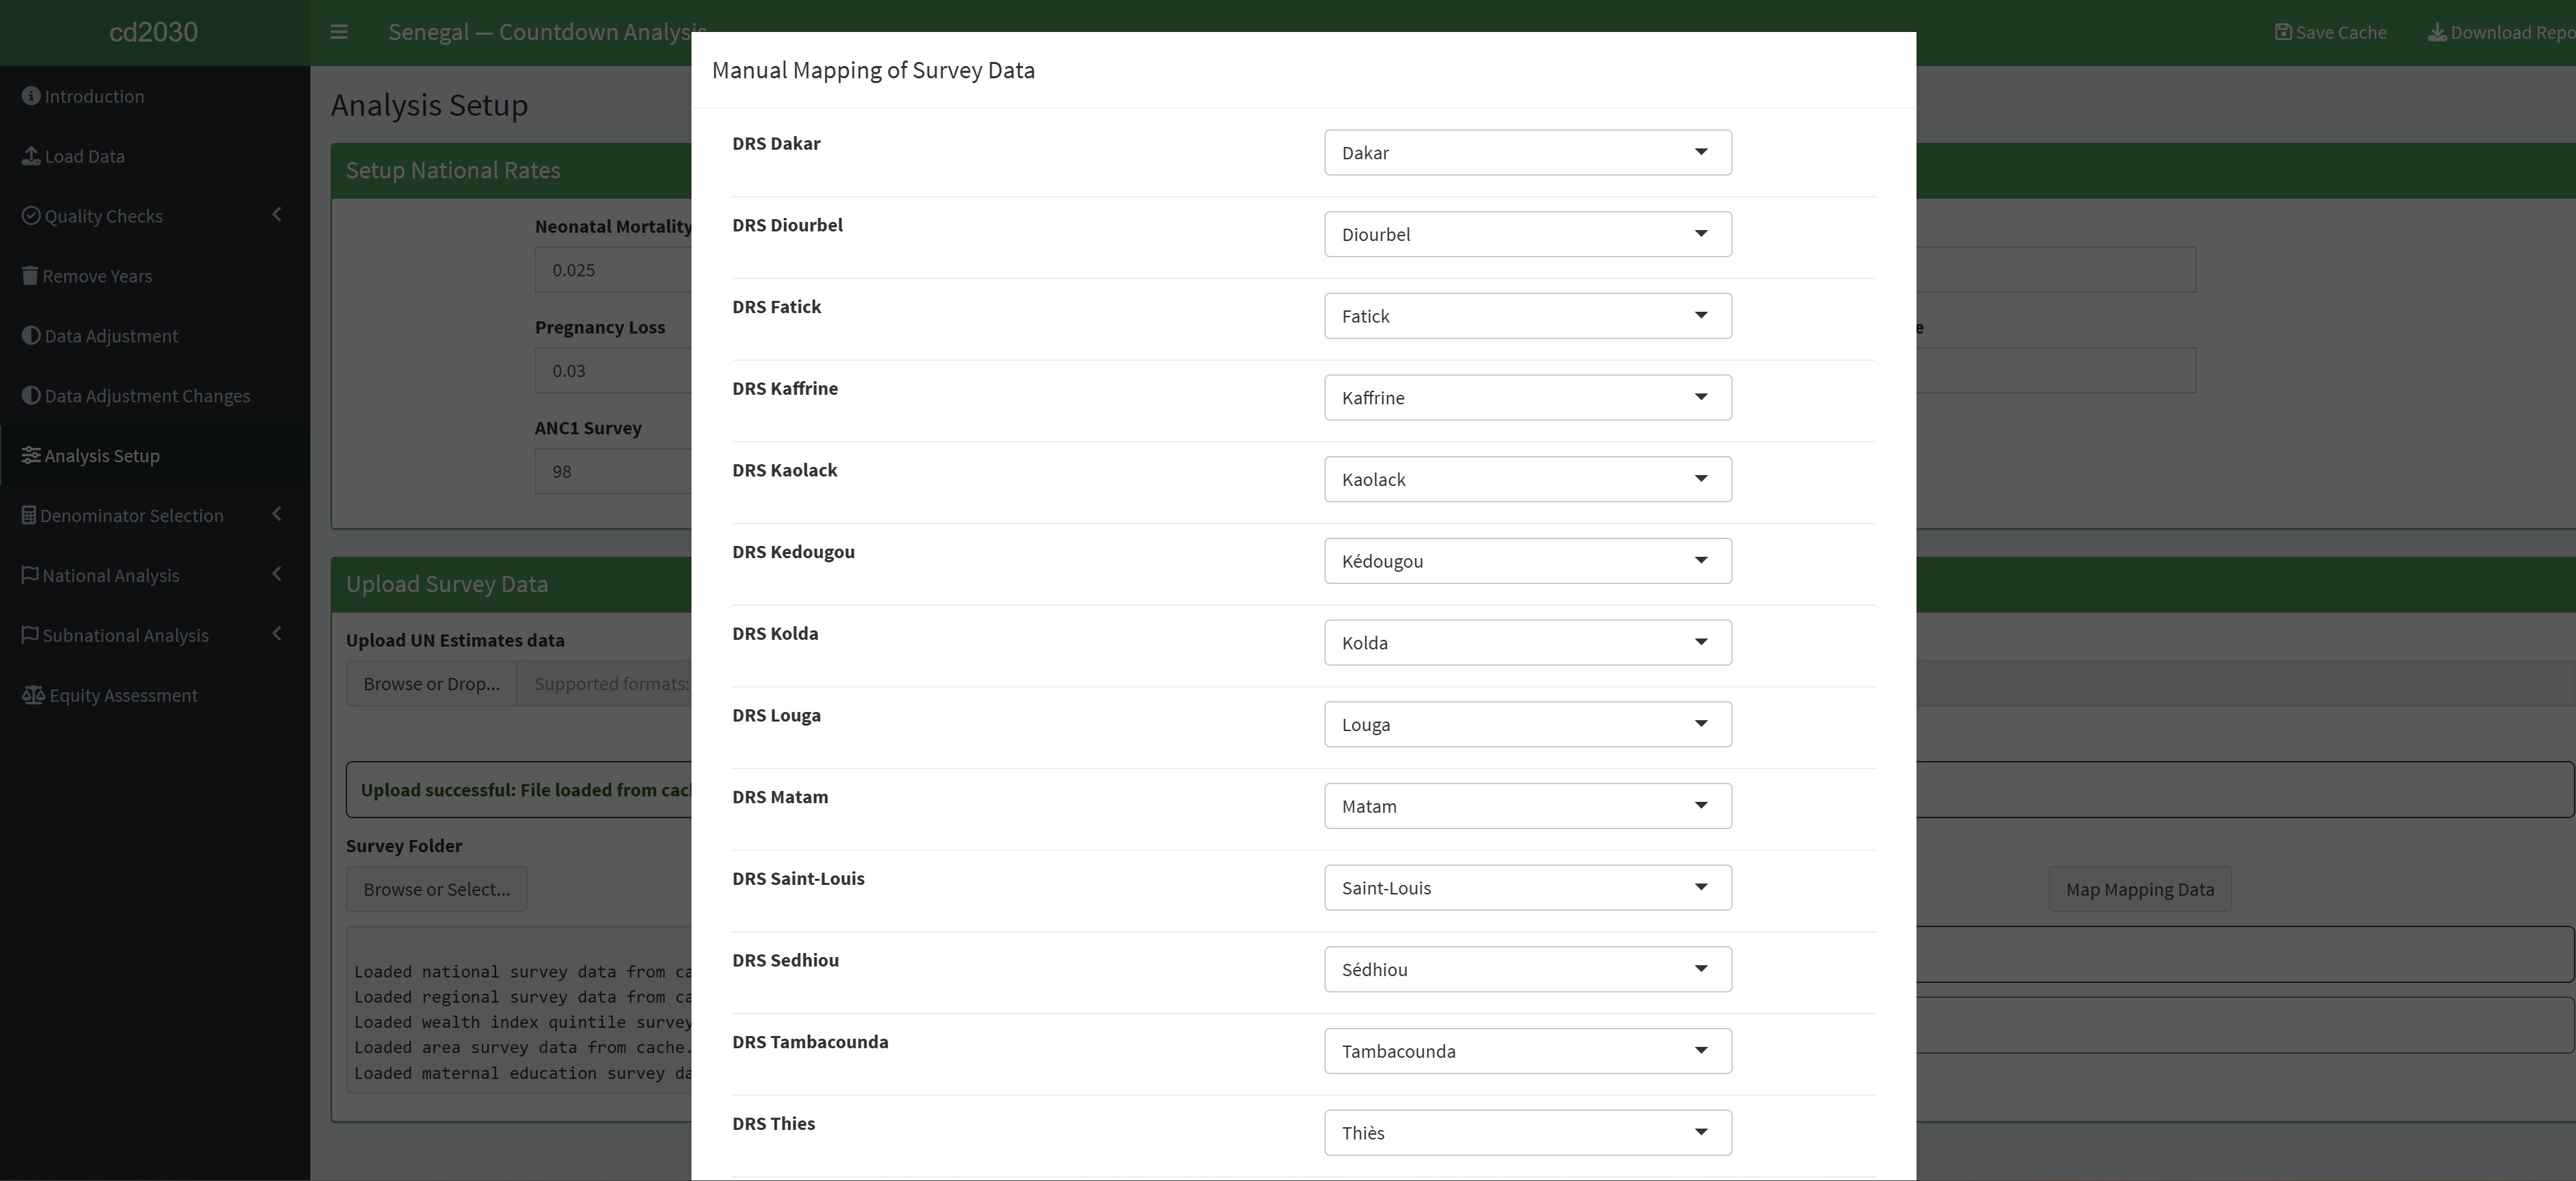
- Review the Regions:
- The mapping window will display a list of survey regions (e.g., “DRS Dakar”, “DRS Diourbel”).
- Each region corresponds to a dropdown menu for mapping.
- Select Corresponding Regions:
- For each region in the left column, select the appropriate mapped region from the dropdown menu on the right.
- Ensure all regions are mapped correctly to avoid discrepancies.
- Save the Mapping:
- After completing the mapping for all regions, click the Save Mapping button to confirm your selections.
- Ensure a confirmation message appears (e.g., “Mapping saved successfully”).
- Verify the Mapping:
- Reopen the mapping window if needed to verify that all regions are mapped correctly.
8.3.2 Notes:
- Manual mapping is optional. If the survey regions already align with the required subnational structure, mapping can be skipped entirely.
- However, if mapping is required, it must be completed fully. Partial mapping is not allowed.
- Double-check each selection to ensure accuracy.
8.3.3 Mandatory for Analysis
Uploading all required files is essential. Without these files, you will not be able to proceed with:
- Denominator Assessment
- National Analysis
- Subnational Analysis
Ensure all files are uploaded before initiating these steps.
8.4 Best Practices
Ensure Data Formats: Upload files in
.dtaformat only, as other formats are not supported.Organize Data: Maintain a structured folder with properly named files to avoid confusion during uploads.
Validate Inputs: Double-check all input values and uploaded files for accuracy.
Monitor Upload Status: Verify that all uploads show a success message before proceeding.
8.5 Troubleshooting
- File Upload Issues:
- Ensure the file is in
.dtaformat. - Confirm that the file path is accessible.
- Ensure the file is in
- Incorrect Rates:
- If you entered incorrect rates, re-enter the values and save them.
- Survey Folder Not Set:
- Ensure the folder exists and has proper permissions.
- Retry selecting the folder if the issue persists.